
Hello! For those of you that follow me on instagram, you’ll know that I recently shared an easy and quick method to get perfectly pieced patchwork squares on my instagram stories. The instagram stories are only available for 24 hours before disappearing and I’ve had so many questions, comments, and messages about the method that I decided to write a blog post for those that missed the instagram stories I posted.
As a disclaimer: I did not invent this method. I heard about it years ago and tried it for the first time just this week. I am sure there are a number of other tutorials and videos out there describing this process, but after sharing how I used fusible interfacing to quickly get perfectly pieced squares on instagram, I wanted to document the method that I used in the hopes that it would help someone out. 🙂
To start out, you’ll need to figure out how big of a piece of interfacing to use. For example, if you are wanting to create a 16″ x 16″ pillow cover out of 2.5″ x 2.5″ squares (the squares will finish at 2″ x 2″ after 1/4″ seam on each side), then you know you’ll need an 8 x 8 grid of squares (8 x 2″ finished=16″ finished). So, the unfinished size will be 8 x 2.5″ unfinished = 20″ unfinished and you’ll want a 20″ x 20″ piece of interfacing. Is that clear as mud? Haha. If the math isn’t your favorite, you can always experiment a little until you feel a little more comfortable with the method. Also, it’s a great idea to make the finished panel a little larger than you think you might need and then you can always trim it to size after. 🙂
Below, you’ll see my piece of fusible interfacing and the squares that I’m using. I decided to make a 5 x 5 grid of 2″ x 2″ squares. This means the squares will finish at 1.5″ x 1.5″ each and my entire finished panel will be 7.5″ x 7.5″ since 1.5″ x 5 = 7.5″.
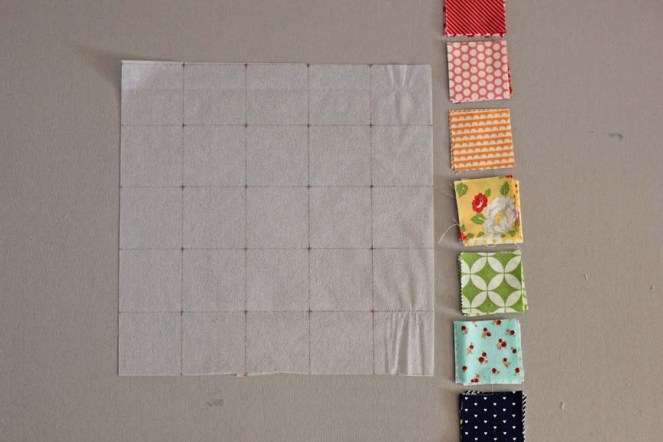
The fusible interfacing I’m using is by TenSisters Handicraft and comes pre-printed with grids on it (neat, huh?). I’ve heard from others who have drawn their own grid lines on a generic lightweight fusible interfacing. I haven’t personally done this, but if you have tried it and have any tips or tricks, leave a comment letting us know. If you are drawing your own grid lines, remember to make them the same size as your cut squares. The grid lines in my pre-printed interfacing are 2″ x 2″, which is why I’m using 2″ squares.
You’ll want the textured, bumpy side of the fusible interfacing to be face up then you can start placing your cut squares right side up inside the grid lines. The squares do not have to perfectly placed–just try to get them lined up straight and any wonkiness will work itself out when you add in the seams.
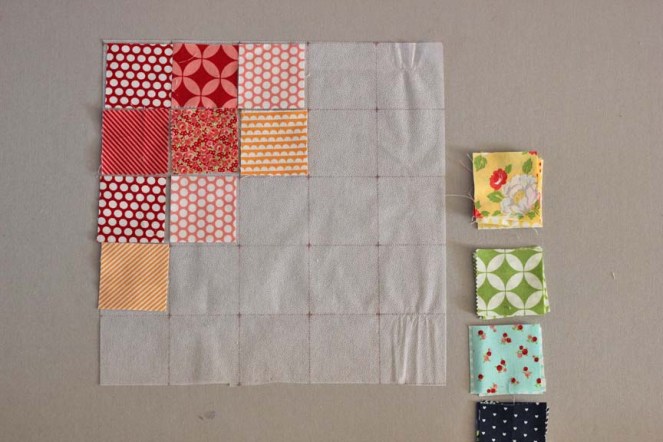
After placing all the squares where you want them, it’s time to iron them in place! Gently set the iron on top of the squares for a few seconds and slowly work your way through the panel. You want to make sure to not the slide the iron across the panel because it might shift the squares before they are completely fused to the interfacing. Pick up the iron and gently set it down, moving around the panel until all the squares are firmly attached to the interfacing.

When the squares are attached properly, you can pick up and move the panel–they won’t be going anywhere!

Now we’ll sew the seams to make our panel into a patchwork piece. Fold over the first column so the crease is right on the grid line. Sew a seam down the entire column 1/4″ away from the crease.
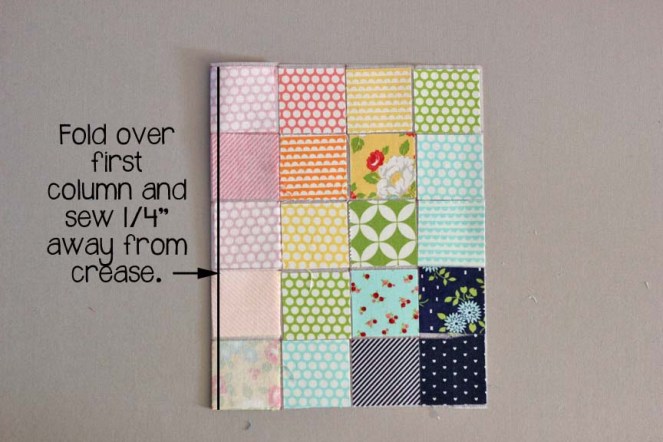

Repeat with the remaining columns, folding each one over at the crease and sewing a 1/4″ seam down the entire column.

When all the columns are sewn, it looks a little goofy and should be quite a bit narrower.

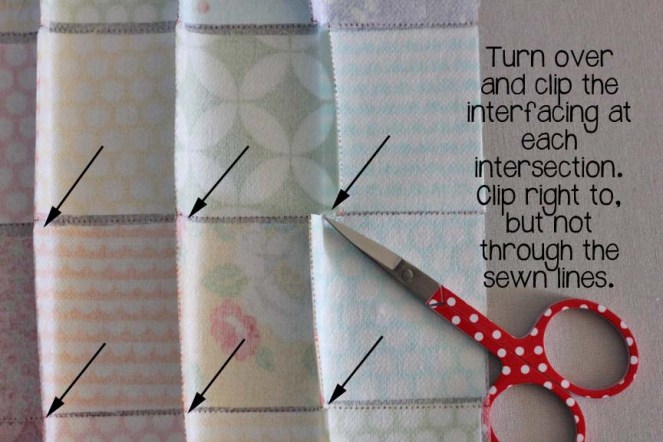
Next, turn the panel over so you’re looking at all the seams on the back. Clip the interfacing at the intersection of each of the grid lines. Clip right to, but not through the sewn lines. Clipping these intersections will allow you to press the seams in opposite directions to avoid huge, bulky seams.
After all the intersections are clipped, iron each row in opposite directions. Again, this will help reduce bulk at the seams.

Now it’s time to sew the rows! Just as you did with the columns, fold over the first row at the grid line and sew a line 1/4″ away from the crease. As you sew, check to make sure that the seams you pressed in the last step are laying in opposite directions so they nest perfectly.

Continue with the other rows until all the rows are sewn.
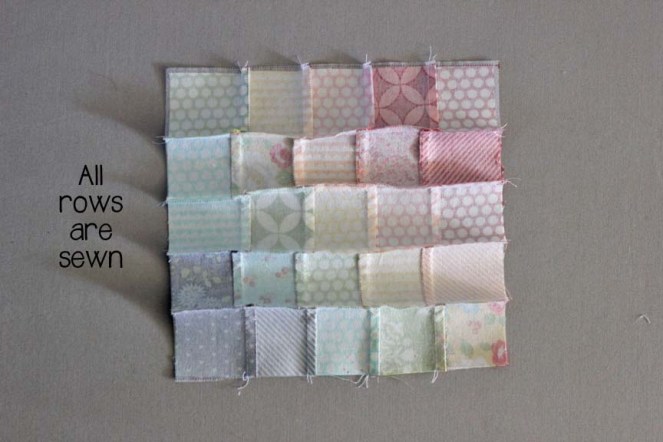
Press the newly sewn seams all in the same direction.

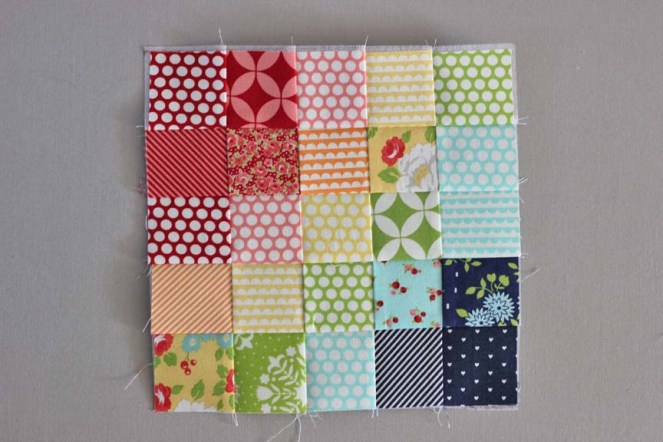
Turn the panel over and press from the front to help flatten out the seams a little more. The interfacing does add a little bulk and stiffness, but if you’re using the panel as a pillow cover or for a pouch, the stiffness can be nice. I’ve heard from others who have used this method for an actual quilt and they didn’t mind the extra weight.
This method definitely saves time and the hassle of trying to remember which tiny square goes where, but I think the biggest benefit is the precise seams! I could never in a million years get all of my seams to match up so well doing it the traditional way! 😉

For those of you that have been wanting to try out my Pixelated Sewing Machine pattern, but are afraid of all those tiny squares, this would be a perfect method for you! It would save sewing time and increase the accuracy of all those tiny seams. 🙂
![]()
Thanks for following along and please let me know if you have any other tips or questions in the comments below. Happy Sewing!

Amazing! Thank you !
LikeLike
You’re welcome, Amanda! 🙂
LikeLike
Thanks for taking the time to document! I’ve sewn for years and years but I’m fairly new to the IG world. I learn so much from everyone! I also didn’t know that interfacing came with pre printed grids! So smart. I swear people must lay awake at nights coming up with this stuff. Anyways, thanks again for the share, I am definitely doing this on future projects. I am a vendor at Pinners this fall in SL and I think I might actually have time to use up all of my scraps and make extra things to take. Have a great day!
LikeLike
Thanks for your kind works, Eilene! This has been on my list of things to try for years and I was pretty excited about how it all turned out. Good luck with your Pinners prep!
LikeLike
I have a Xmas wall hanging that is 80% finished and just sitting there for a year (it’s made of entirely 2 inch squares). It’s beautiful, but the 2inch squares are off, every row I have had to ease. It’s a pain so I gave up. I sooo wish I knew about this interfacing! Thanks for the tutorial.
LikeLike
I know how that is to not want to finish a project that isn’t turning out like you thought it would! I heard about this method and finally gave it a try last year and thought it was pretty amazing! I’ll definitely be using it again and again. I’m glad the tutorial can be useful for you, too! 🙂
LikeLike
I imagine you’d want to use the lightest weight interfacing possible. Which weight do you use? I’ve seen featherweight and ultra-lightweight Pellon – the ultra-lightweight is the lighter of the two. Do you think that would be the best to use if I plan to draw my own grid?
LikeLike
Hi Linda! Yes, I’d think the lightest weight would be best if you are marking yourself. That way, it will eliminate some of the thickness behind the patchwork. Just make sure it’s only fusible on one side, and you should be good to go! 🙂
LikeLike
Adorable! Will this interface soften up after washing?
LikeLike
https://www.crucible-technologies.co.uk/registrationcomplete.aspx?returnurl=https://beurette.club/
LikeLike
How can I layout a log cabin block using the fusible interfacing?
LikeLike
Thank you for the great tutorial. I always had trouble with getting even squares. Mine where always wonky. This is so much easier. I made a Pocket Prayer Pouch from the square pattern. If you would like to see it, it’s on my blog at: blueozeannestdezignz.blogspot.com
LikeLike
OH MY GOD. As a relatively new quilter this is AMAZING. I was ready to just have a total meltdown over my continued failure to line squares up. Thank you!
LikeLike
Can you use interfacing to stabilize & reduce the stretch of bias pieces in an on-point quilt block?
LikeLike
THANK YOU, THANK YOU, THANK YOU!! I found this posting last Spring while I was planning some watercolor wall hangings I wanted to make for Christmas gifts, but I was stupid and didn’t print your posting. I am now ready to start those gifts, and I have spent the last three hours searching the Internet for this posting. FOUND IT! Whew! This will make the job MUCH easier and so quick! Thank you for sharing!
LikeLike