
When OLFA and Aurifil asked me to participate in their new Slice & Stitch challenge and make a project using two of their products, I knew a pillow cover was the perfect choice to demonstrate the versatility of the OLFA rotary cutter and Aurifil 50wt thread. The OLFA rotary cutter is a no-brainer when it comes to cutting fabric or trimming up the pillow cover and I love that I can use the Aurifil 50 wt throughout the whole process–from piecing the quilt block, to machine quilting, to installing zippers, and everything in between. It really is a great go-to 100% cotton thread!

Instead of just sharing photos of the pillow I made, I thought I’d post a step-by-step photo tutorial on how to turn a quilt block into an easy zippered pillow cushion. And don’t get scared off by the zipper! Read ahead and you can see that it’s really not that scary! 🙂

Let’s start out with the quilt block that we want to make into a pillow cover. As a general rule, I try to make my quilt block 1-2″ smaller than the pillow insert. This will make the pillow nice and full instead of droopy (and no one likes a droopy pillow, right?). 😉 If the quilt block you want to turn into a pillow isn’t quite large enough, just add an extra border or two onto the outside edges!
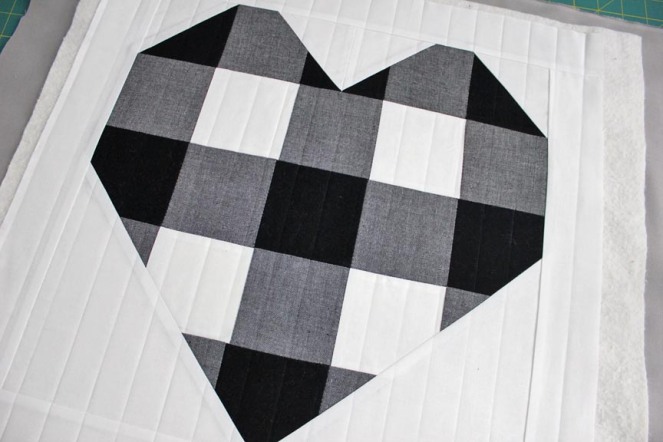
Below is the quilt block I started with. It’s one of the test blocks I did for my Farmhouse Hearts pattern (found HERE) and I thought it would make a great pillow cover. I had to throw in my OLFA Ruby rotary cutter for the photo, too. 🙂 It’s a limited edition rotary cutter celebrating the 40th anniversary of OLFA’s invention of the rotary cutter. So if the red makes your heart go pitter-patter, be on the lookout for one!

We’ll start by making a quilt sandwich so we can quilt the block. I like to use Odif 505 Spray Adhesive to get my quilt sandwich nice and smooth. When spray adhesive is used, always spray the batting, not the fabric. To avoid overspray from the spray adhesive, I tape the lining fabric (that will be on the inside of the pillow cover) to an older cutting mat. This will help straighten out the lining fabric and also catch any stray spray.

After the lining fabric is taped to the cutting mat, lay out the batting square, pull half of it up, spray the batting (see photo below), then gently smooth the batting down and pressing out any wrinkles with your hands. Repeat with the top half of the batting. If you have wrinkles or puckers, you can gently pull the batting up off of the lining and reapply. Next, spray the batting with the spray adhesive and repeat with the quilt top to get a nice, smooth quilt sandwich.

Now the quilt sandwich is ready to be machine quilted. I love the look of straight line quilting, and wanted to share a few tips and tricks for getting evenly spaced lines. The white tool in the photo below is called a Hera Marker and is excellent for marking lines on fabric. I line up my long ruler where I’d like a quilting line to go and use pressure to make an indent with the Hera Marker along that line.

Repeat as many times as needed to get the design “sketched” out on the quilt sandwich. I made vertical lines one inch apart on my plaid heart quilt sandwich below. If you are planning on a design with tightly spaced lines (less than 1 inch apart), it’s often a good idea to make your pillow front a little larger than necessary, as I’ve found the pillow front can “shrink” a little as it’s quilted. If you add a little extra length and width onto the quilt block before quilting, you can always trim to size afterwards.
I used Aurifil 50wt thread along with a walking foot on my domestic machine to quilt the straight lines for this pillow cover. I also like to lengthen the stitch length from 2.5 to around 3.5 to help the stitches look more substantial.

After the quilting is completed, trim the quilt sandwich to the desired size.

I love the look of a quilted back on a pillow cover, so I like to repeat the process and make another quilt sandwich the same size as the pillow front. A single piece of fabric cut to the same size as the pillow front can also be used.

The pillow cover is ready for the zipper now! Choose a zipper that is at least as long as the pillow cover is wide. It’s okay if it happens to be much longer, but it does need to be at least the same size as the pillow.
Cut two pieces of fabric, each approximately 2.5″ x 6″. Fold each in half to make a 2.5″ x 3″ piece and press. These fabric pieces will be the zipper tabs. Lay the zipper out on top of the pillow cover with the zipper partway unzipped and the zipper pull up (facing you not the pillow cover). Place the two zipper tabs on either end of the zipper with the pressed edges facing in toward the zipper pull.

The folded end of the zipper tabs should be placed about 1.5″ away from the outside of the pillow cover. Making sure the zipper pull is still in between the tabs, sew the tabs directly onto the zipper, about 1/8″ away from the folded/pressed edge.

Cut off any excess length from the zipper and tabs so the unit is the same length as the pillow cover. Trim the top and bottom of the zipper tabs so they are also the same height as the zipper.

Flip the zipper so it is right sides together with the pillow cover and so the bottom edges line up.

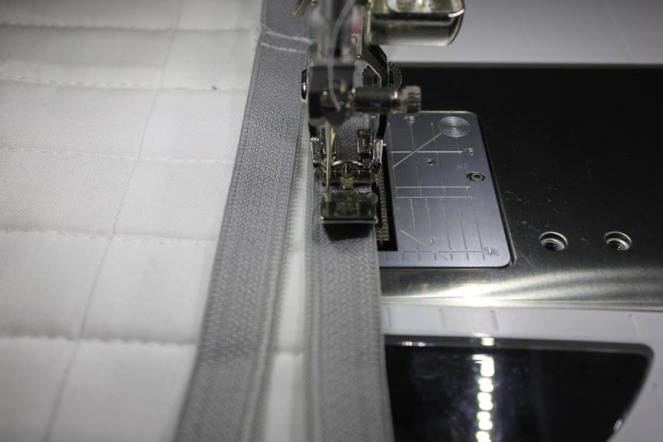
Using a zipper foot, attach the zipper by sewing about 1/8″ – 1/4″ away from the zipper teeth. The distance doesn’t matter so much, just try to stay consistent and make sure the zipper stays lined up with the edge of the pillow cover. When the presser foot gets close to the zipper pull, lower the needle and raise the presser foot. Gently slide the zipper past the presser foot and out of the way. Lower the presser foot and continue attaching the zipper.
After attaching the zipper to the pillow front, top stitch along the bottom edge of the pillow front.

Now, lay the pillow front + zipper unit right sides together on top of the pillow back. Line up the zipper with the bottom edge of the pillow back.

Repeat the process by sewing the zipper to the pillow back and then topstitching at the bottom of the pillow back.

Lay out the pillow so the front and back are right sides together and the top edges are aligned. Move the zipper pull so it is unzipped at least halfway (so the pillow can be turned right side out after).

Fold the zipper tabs so they are between the front and the back panels.

With the top edges aligned and the zipper tabs in between the layers, sew along the three unattached edges of the pillow covers as shown in photo below (but obviously make sure the pillow front is completely aligned with the pillow back and not folded down like it is in the photo 🙂 ).

Turn the pillow right side out, insert a pillow form, and admire your creation! Super easy, right? I love this method for a somewhat hidden zipper and use it often when I want a clean, finished look. I also frequently use a simple envelope back, so I think a tutorial for that method will be in the works soon. 🙂
Thanks for following along and I hope this tutorial will come in handy the next time you are wanting to make a pillow cover! Anything else you’d like to know? Leave a comment below! As I mentioned above, more info on straight line machine quilting and a simple envelope back pillow cover are on my list, but please let me know what exactly would be useful for you. 🙂
Happy Sewing!
(This post contains affiliate links)

Great tutorial. Thanks. I am always nervous about adding a zipper to a pillowcase so usually make envelope covers. Not any more!
LikeLike
Great tutorial! I try to make new pillows each month for my office area — great way to test blocks or see how fabrics and colors work together!
LikeLike
I have trouble filling out the corners of my pillows so evenly and “plumply”. What measures do you use on each size foam? For instance, if it is a 16 in foam insert, what size cover? 16 inches seems to hap for me. Thanks
for this easy to understand tutorial.
LikeLike
Gap, not hap, I meant
LikeLike
Hi Marsha, if I have a 16″ insert, I would aim for a pillow cover around 14″ x 14″. That would help fill out the corners a bit. I usually use down alternative pillow inserts as they are inexpensive and work well for what I need. I haven’t used a foam insert before, but I’d imagine if you are having difficulty filling out the corners, aiming for a smaller pillow cover would do the trick. 🙂
LikeLike
Thanks so much! That is my problem I bet. I make the cover the same size as the insert.
LikeLike
Nancy Zieman (Sewing with Nancy) has a method of sewing the corners of pillow shams that takes care of the “empty corners” syndrome. Instead of sewing exactly square corners, the seam line curves a bit at the corners … check it out.
LikeLike
Great tutorial! Ill be using this really soon! What do you use to cut the zipper and excess tab fabric and how do you do it?
LikeLike
Hi Christina! I usually use fabric scissors to cut the excess tab fabric–I just do my best to get it cut to the right size. I use other scissors (not my fabric ones) to cut the extra zipper off. I use plastic zippers and haven’t had any trouble cutting them to size, but definitely don’t want to try it with my fabric scissors. 🙂
LikeLike
Thank you! I’ll give it a go!
LikeLike
LOVE IT!!!
LikeLike
I’m impressed that the hera marker truly works for you. I am inspired to try it too.
LikeLike
Yes, I love the Hera marker! I use it to mark straight lines for machine quilting and also for hand quilting. 🙂
LikeLike