
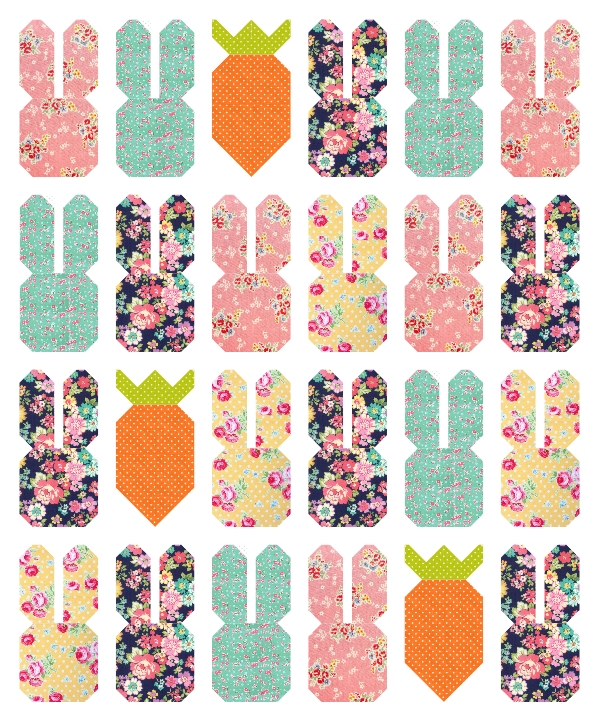
Today’s the day to share the second block in my Easter Parade table runner! The fun carrot quilt block sews together super fast and fits in perfectly with the bunny quilt block I shared last week HERE.
UPDATE: The free quilt block instructions are below, but if you’d like a printable PDF copy of the directions with fabric requirements and cutting instructions for mini quilt and throw quilt options, an Easter Parade PDF pattern is available in my Etsy shop HERE.


Cutting Instructions:

Assembly Instructions:
Step 1: Gather the (4) F pieces and (2) E pieces and draw a line on the wrong side of the fabric, corner to corner. Set two of the F pieces aside for the next step. Place the other (2) F pieces on the top corners of the A piece, right sides together, as shown. Trim the excess corner off, 1/4″ away from the sewn line and press the seams open. Repeat with the E pieces on the bottom corners.

Step 2: Gather the B piece and the remaining two F pieces. Place the two F pieces on the ends of the B piece, right sides together, and oriented as shown below. Sew right along the drawn line, trim off the excess corner 1/4″ away from the sewn line and press open. This new unit will be the bottom half of the carrot leaves.

Step 3: Gather the (2) G pieces, (2) C pieces, and (2) D pieces. Place the C pieces on top of the outer edges of the G pieces, right sides together, so the C pieces overhang the top edge of the G piece. Sew a line from the bottom inner corner of the C piece to the top outer corner of the G piece (if you prefer, you can draw a line on the wrong side of the fabric first to guide you). Trim off the excess corner and press open. Draw a line corner to corner on the wrong side of the D pieces. Place the D pieces on the inner corner of the G piece, right sides together, and sew directly on the drawn line. Trim excess corner and iron seam open. Sew the two G units together and press seam open to create the top half of the carrot leaves.

Step 4: Lay out the carrot block as shown below and sew the three units together. Press seams open.

Step 5: The finished carrot block should now measure 5″ x 9.5″ and is ready to be combined with the bunny blocks!

The carrot block fits in perfectly with a few bunnies to make a table runner (bunny tutorial HERE).
Or if you’re looking for a larger project, keep multiplying those bunnies and make a full sized quilt! (The complete pattern for this larger quilt is located in my Etsy shop HERE).
I hope you enjoy making your own Easter Parade projects and make sure to share your creations on social media with me using the hashtag #centerstreetquilts.
Happy sewing!

Super cute, Kristina!
LikeLike
Thank you, Kairle!! You are always so sweet and supportive!
LikeLike
This is so adorable. I have made several of your bunnies so far and this carrot just is the perfect touch! Thanks so much for sharing and just in time for me to crank a couple out for Easter!
LikeLike
Thank you for your kind words! I’m glad you’ve enjoyed the bunny blocks and hope the carrots go together just as smoothly for you. 🙂
LikeLike
If i make two of the bunnies, do you think they’ll multiply overnight so I can make a quilt?
LikeLike
Haha!! I wish that’s how fabric bunnies worked!! 🙂
LikeLike
Absolutely delightful!
LikeLike
Thank you so much!
LikeLike
I think I have something mixed up. on the carrot leaves, the second part where it says to have the “c” piece higher on the top of the “g” piece, my “c” piece is 1.5 inches square so there is no overlap. Should it be the “d” piece that is higher? Im thinking the c and d are switched?
LikeLike
Yes, you are absolutely correct! I’ve just updated the cutting instructions to switch the C and D measurements. Not my first mistake and definitely won’t be my last!! 😉 Thanks for catching that and bringing it to my attention!
LikeLike
The background piece looks like your measurement is 2 1/2 X 1 1/2. Should this be 2 3/4 X 1 1/2. That would make the finished top two blocks equal 5 inches….
LikeLike
Hi Kathleen! When you sew the C units onto the outer sides of the background G units, it will lengthen them a little and equal 5″ in width. (The G units don’t make a true flying geese since the C units are rectangular instead of square). I hope that helps!
LikeLike
Thanks for this adorable pattern I am going to try and make this for an Easter family gathering
LikeLike
You’re welcome! I’m glad that you’ll get a chance to try it out! 🙂
LikeLike
Thank you so much, the bunny and carrots 🥕 are sew perfect together! Everything you make is sooo beautiful!
LikeLike
Thank you for your sweet message, Barbara!! I hope you enjoy these fun quilt blocks. 🙂
LikeLike
What fabric did you use for the bunnies?
LikeLike
Hi Julie, For these images of the bunnies, I used some of my favorite floral prints. Some are Atsuko Matsuyama and others are from the Regent Street Lawn 2018 fabric line from Moda. I hope that helps!
LikeLike
What a great addition to the Moda Bake Shop pattern. I like it as a whole quilt, thanks!
LikeLike
Thank you so much, Susan!
LikeLike